# iOS

{% hint style="info" %}
对应的[官方页面地址](https://contributing.bitwarden.com/getting-started/mobile/net-maui-legacy/ios/)
{% endhint %}

{% hint style="warning" %}
**Legacy**

在 .NET MAUI 中完成的**旧版** iOS App 入门。
{% endhint %}

## 要求 <a href="#requirements" id="requirements"></a>

1. Visual Studio 2022 / VS Code
2. [.NET 8（最新版本）](https://dotnet.microsoft.com/zh-cn/download/dotnet/8.0)
   * 在 Mac 版 Visual Studio for Mac 中，您可能需要通过 Visual Studio > Preferences > Preview Features > Use the .NET 8 SDK 来打开 .NET 8 功能
3. .NET MAUI Workload
   * 您可以通过运行 `dotnet workload install maui` 来安装它
4. 安装了 Xcode 15.0 的 Mac

## Apple 开发者账户设置 <a href="#apple-developer-account-setup" id="apple-developer-account-setup"></a>

1. 接受邀请加入 Bitwarden Apple Developer 团队。您的电子邮件中应该会收到一个请求，主题是「您被邀请加入开发团队」。点击链接「接受邀请」，系统会提示您为自己的 Bitwarden 电子邮件地址创建一个 Apple ID。如果您没有收到这封邮件，请联系 IT 部门 (@IT in slack)。接受条款和条件并完成注册流程
2. 访问 [Apple ID Online](https://appleid.apple.com/)，使用新的 Apple ID 登录。设置因素身份验证（使用手机和/或受信任的设备）-- 这一点至关重要，因为苹果不再允许没有 MFA 的「开发者」账户，但在本地构建失败时它不会告诉你这一点
3. 访问 [App Store Connect](https://appstoreconnect.apple.com/) 并接受条款和条件
4. 确保您有权访问 Bitwarden 团队和团队应用程序配置文件
5. 访问 [Apple Developer Account](https://developer.apple.com/account/)，然后转到「证书、ID 和配置文件」菜单项。检查是否能在「证书」部分看到 8bit Solutions LLC 证书，以及在「配置文件」部分看到 Bitwarden 配置文件。如果缺少其中任何一项，请向 IT 部门 (@IT #tech-support in slack) 询问附加角色/权限

## macOS 设置 <a href="#macos-setup" id="macos-setup"></a>

接下来，您需要为构建和运行 Bitwarden iOS 移动项目设置 Mac 环境。这需要创建必要的开发人员配置文件，以便在 Mac 上通过 Xcode 进行代码签名和执行。Visual Studio 有一个获取所有供应配置文件的简单过程，但在没有太多反馈的情况下很容易失败。请先尝试 Visual Studio 的说明（「简单方式」），如果需要，再使用 Xcode 的说明（「复杂方式」）。

### Visual Studio：简单方式 <a href="#visual-studio-the-easy-way" id="visual-studio-the-easy-way"></a>

1、打开 Visual Studio for Mac

2、转到 Preferences > Publishing > Apple Developer Accounts

3、点击「Add」，选择「Enterprise Account」，然后使用之前配置的 Apple 开发者账户登录

{% hint style="info" %}
如果您收到「Failed to synchronize with Apple Developer Portal」（无法与 Apple Developer Portal 同步）错误，则表示您缺少附加角色/权限。
{% endhint %}

成功登录后，您应该在列表中看到您的账户，并在账户团队列表中看到「Bitwarden Inc」

4、点击「View Details…」

5、如果您没有有效的 Apple 开发证书，请点击 Create certificate > Apple Development

6、点击「Download All Profiles」

7、您现在应该可以通过设置左上角的 `iOS > Debug | iPhone Simulator > [pick any iOS Simulator]` 然后按「Play」来运行 App 了

<figure><img src="https://contributing.bitwarden.com/assets/images/run-debug-81ba8d56bdba21767e27f03a980585ee.png" alt=""><figcaption></figcaption></figure>

如果可以运行，您可以跳到下一部分。

如果只有「Generic Simulator」（通用模拟器）选项，并提示降低「Deployment Target」（部署目标），则您的 MAUI 版本可能尚不支持您正在使用的 Xcode 版本（如[此处](https://github.com/xamarin/xamarin-macios/issues/15954#issuecomment-1246025735)所讨论）。

{% embed url="<https://contributing.bitwarden.com/assets/images/troubleshoot-generic-simulator-54e1581c5f70b5930d86347d2e940eb0.png>" %}

要解决这个问题，请尝试从 Apple [下载](https://developer.apple.com/download/all/)并安装旧版本的 Xcode（您可以从 Xamarin.iOS [发行说明](https://github.com/xamarin/xamarin-macios/releases)中查找有关使用哪个 Xcode 版本的指导）。安装新版本的 Xcode 后，重启 Visual Studio 并加载项目以验证可用的模拟器选项。

{% hint style="info" %}
如果您需要在您的开发机器上安装多个版本的 Xcode，您可以将从下载中提取的 `Xcode.app` 文件重命名为其他名称（例如「Xcode\_14\_2.app」），然后将其放入您的应用程序文件夹中。然后，您可以在命令行中使用 `xcode-select` 以在 Xcode 版本之间进行切换：

```bash
sudo xcode-select -s /Applications/Xcode_14_2.app
```

您可以使用 Xcodes.app 等工具获得类似的结果
{% endhint %}

### Xcode：复杂方式 <a href="#xcode-the-hard-way" id="xcode-the-hard-way"></a>

{% hint style="info" %}
如果您是下一个按照这些说明操作的人，请提交并上传您创建的 Xcode 项目文件，以便我们简化这一流程。
{% endhint %}

仅当上述 Visual Studio 说明不适合您时才尝试这些说明。

1、打开 Xcode

2、接受所有默认设置，确保已安装所有扩展/附加组件等

3、Create new project... > iOS > App
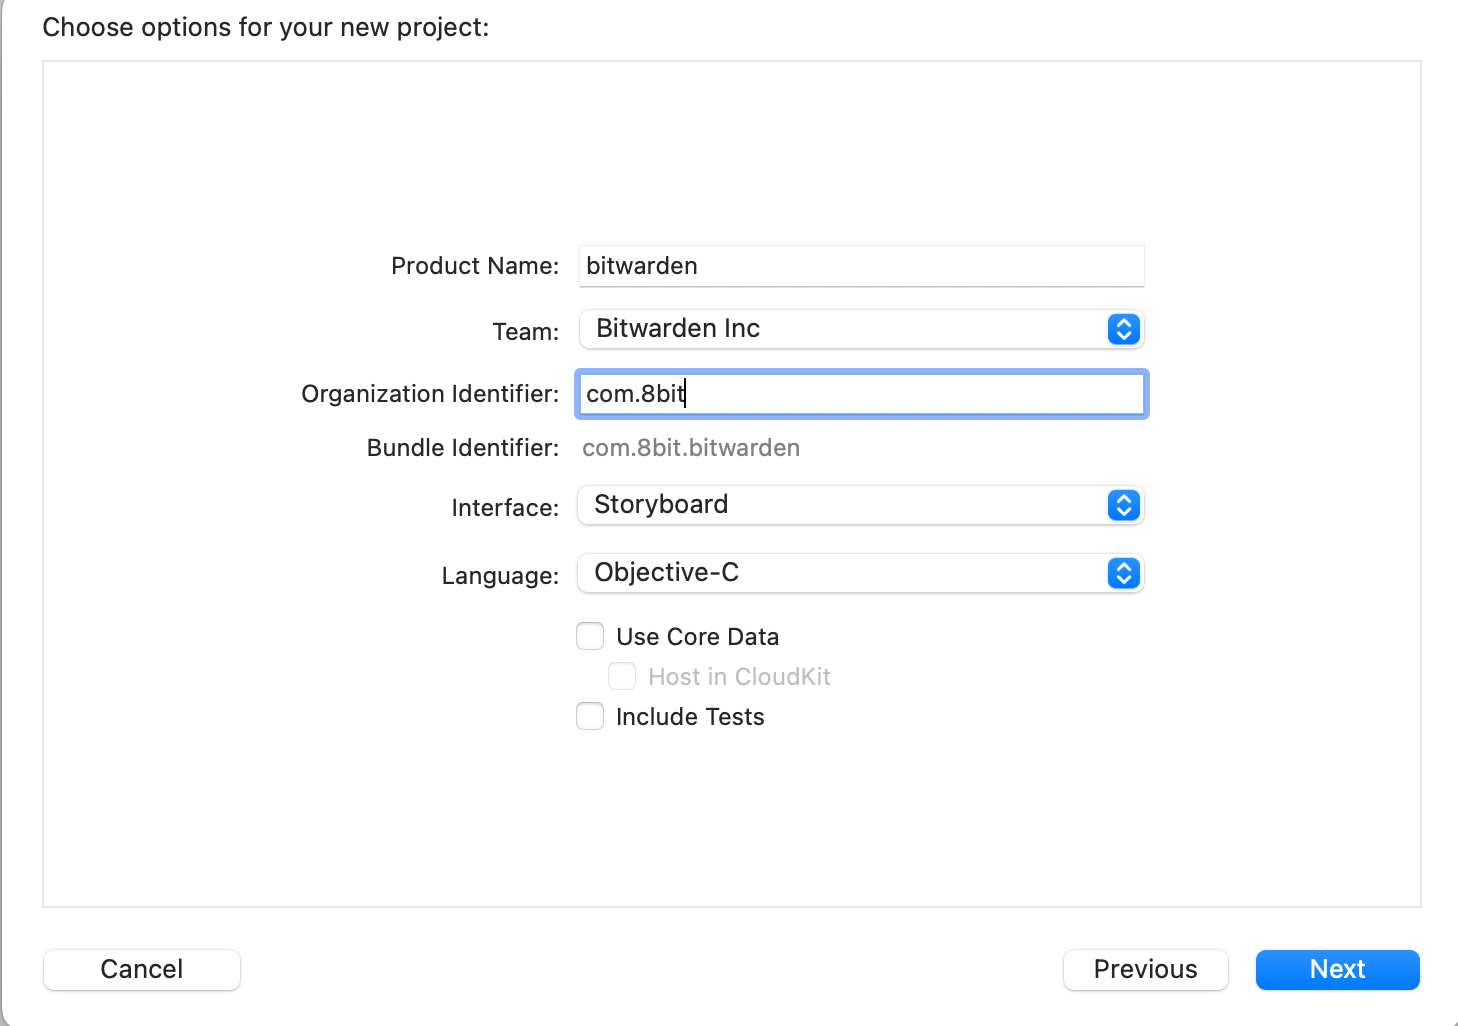
4、对您的新项目使用以下选项：

* 产品名称：「bitwarden」
* 团队：Bitwarden Inc（如果缺少，请仔细检查上面您的 Apple 开发者账户设置）
* 组织标识符：「com.8bit」
* 绑定标识符（自动生成）：「com.8bit.bitwarden」
* 语言：「Objective-C」
* 用户界面：「Storyboard」
* 保留所有其他复选框未选中（或取消选中它们）

<div align="left"><figure><img src="https://contributing.bitwarden.com/assets/images/new-project-options-03e83d1de2942e190f3d992d846409df.png" alt=""><figcaption></figcaption></figure></div>

5、点击「Next」，保存到默认位置，然后点击「Create」

6、在项目配置页面上，点击「Signing & Capabilities」选项卡

7、确保您具有以下默认值：

* 自动管理签名：（已选中）
* 团队：Bitwarden Inc
* 配置配置文件：Xcode 托管配置文件
* 签名证书：您的 Apple ID/Name

{% embed url="<https://contributing.bitwarden.com/assets/images/signing-and-capabilities-241bc2966623419ab15ef49a36c2a153.png>" %}

8、从菜单栏中，点击 Product > Build

9、重复步骤 3-8，并在步骤 4 中进行以下更改：

* 产品名称：「find-login-action-extension」
* 组织标识符：「com.8bit.bitwarden」
* 捆绑定标识符（自动生成）：「com.8bit.bitwarden.find-login-action-extension」

10、重复步骤 3-8，并在步骤 4 中进行以下更改：

* 产品名称：「autofill」
* 组织标识符：「com.8bit.bitwarden」
* 捆绑定标识符（自动生成）：「com.8bit.bitwarden.autofill」

11、重复步骤 3-8，并在步骤 4 中进行以下更改：

* 产品名称：「share-extension」
* 组织标识符：「com.8bit.bitwarden」
* 绑定标识符（自动生成）：「com.8bit.bitwarden.share-extension」

12、如果您有想要用于测试的物理设备（例如 iPhone 或 iPad），您还需要对刚刚创建的每个 Xcode 项目执行以下操作：

* 用电缆连接设备
* 在 Xcode 中选择您的设备作为构建目标
* 从菜单栏中，点击 Product > Build
* 如果询问，请同意注册您的设备

{% hint style="info" %}
有时这些配置文件可能会比较混乱。如果您在物理设备（或模拟器）上运行时遇到问题，请尝试运行 `rm -r ~/Library/MobileDevice/Provisioning\ Profiles` 来清除它们。再次构建每一个 Xcode 项目以重新生成它们。
{% endhint %}

## Visual Studio <a href="#visual-studio" id="visual-studio"></a>

接下来，我们需要配置您的 Visual Studio 开发环境。

{% tabs %}
{% tab title="Windows" %}

1. 连接到您刚刚完成上述步骤的 Mac
2. 打开 Visual Studio 然后点击 Tools > iOS > Pair to Mac
3. 扫描并选择您的机器。如果看不到，请点击「Add Mac...」按钮并输入 Mac 名称或 IP 地址。如果不知道 Mac 名称（或 Mac 上有 Windows 虚拟机），请进入 Mac，打开 Preferences > Sharing，查找机器的「.local」地址。
4. 出现提示时提供您的 MacOS 用户名和密码
5. 配对后，关闭「Pair Mac」窗口
6. 将活动的构建配置文件更改为 Debug > iPhoneSimulator > iOS
7. 从解决方案资源管理器重新构建 iOS 项目
8. 您现在可以使用 iOS 模拟器进行调试了
   {% endtab %}

{% tab title="macOS" %}

1. 检查是否安装了命令行工具：
   * 打开 Xcode
   * 从菜单栏中，点击 Xcode > Preferences > Locations
   * 确保在「Command Line Tools」下选择了 Xcode 版本
2. 打开 Visual Studio for Mac
3. 打开本地移动存储库根目录中的移动解决方案文件 (`bitwarden-mobile.sln`)
4. 在顶部栏中，您应该能够选择 App > Debug > 选择您的模型然后点击「Run」（如果您设置了物理设备，则选择您的物理设备）
   {% endtab %}
   {% endtabs %}

## 构建 <a href="#building" id="building"></a>

要从 CLI 构建，请导航到应用程序目录：

对于设备：

```vbnet
cd src/App
dotnet build -f net8.0-ios -c Debug -r ios-arm64
```

对于模拟器：

```vbnet
cd src/App
dotnet build -f net8.0-ios -c Debug -r iossimulator-x64
```

您也可以使用 IDE，但请注意：

{% hint style="success" %}
**Visual Studio for Mac**

目前在 Visual Studio for Mac 上构建项目时存在一些问题，因此如果您遇到一些错误，请使用 CLI 在 `src/App` 文件夹中构建（请先移除 bin/obj 文件夹）。
{% endhint %}

{% hint style="success" %}
**Argon2Id**

如果在为模拟器构建时发现有关 argon2Id 库的任何错误，请确保您正在为运行时标识符 `iossimulator-x64` 构建，因为目前该库不支持 `iossimulator-arm64`。
{% endhint %}

{% hint style="success" %}
**常见错误的故障排除**

如果您发现以下错误：

> `error NETSDK1134`：不支持使用特定 RuntimeIdentifier 构建解决方案。如果您想发布单个 RID，请在单个项目级别指定 RID

您几乎肯定是在尝试从根目录构建 App。 请转到 `src/App`，然后重新尝试构建。
{% endhint %}

### Argon2Id 库加载[​](https://contributing.bitwarden.com/getting-started/mobile/net-maui-legacy/ios/#argon2id-library-loading) <a href="#argon2id-library-loading" id="argon2id-library-loading"></a>

几乎所有解决方案项目都使用 `MTouchExtraArgs` 加载 Argon2Id 库 (`libargon2.a`)。为了简化这一过程，我们在 **Directory.Build.props** 中添加了一个名为 `Argon2IdLoadMtouchExtraArgs` 的属性，其中包含填写额外 args 参数的代码。每个项目都配置了该属性，因此只需在正确的运行时标识符上添加该属性，我们就能在每种情况下成功构建 App。

### 忽略扩展/watchOS App[​](https://contributing.bitwarden.com/getting-started/mobile/net-maui-legacy/ios/#ignoring-extensions--watchos-app) <a href="#ignoring-extensions--watchos-app" id="ignoring-extensions--watchos-app"></a>

有时，我们需要快速构建 App，或者 iOS 扩展或 watchOS App 上的一些配置会妨碍我们。为了让我们能快速只关注主 App，我们在 **Directory.Build.Props** 中添加了两个属性来帮助解决这个问题：

* `IncludeBitwardeniOSExtensions`：如果为 `True`，则在构建主 App 时将包含所有 iOS 扩展，否则将跳过。
* `IncludeBitwardenWatchOSApp`：如果为 `True`，则在构建主 App 时将包含 watchOS App，否则将跳过。

{% hint style="warning" %}
**共享代码**

关闭这些选项可以提供更快的开发者体验，这在很多情况下都非常有用，但请始终牢记，主 App 和扩展程序之间共享了很多内容，因此在推送您的工作之前，请在启用所有选项的情况下再次进行测试，以防万一。
{% endhint %}

### 本地发布模式[​](https://contributing.bitwarden.com/getting-started/mobile/net-maui-legacy/ios/#release-mode-locally) <a href="#release-mode-locally" id="release-mode-locally"></a>

有些问题需要我们在 **Release** 配置上构建 App，但不通过 CI/CD 管道，而是在本地构建。问题是我们没有本地分发的代码签名详细信息。为了解决这个问题，我们可以在 **Release** 配置上使用与 **Debug** 相同的 `CodesignProvision` 和 `CodesignKey`。但要在每个项目上都更改这两个属性有点麻烦，因此我们在 **Directory.Build.Props** 中添加了两个属性来帮助解决这个问题：

* `ReleaseCodesignProvision`：`CodesignProvision` 在所有项目中的 Release 配置
* `ReleaseCodesignKey`：`CodesignKey` 在所有项目中的 Release 配置

通过替换它们的值，所有项目都将应用这些值，这样在本地以 **Release** 模式构建 App 就更容易了。

## 调试 <a href="#debugging" id="debugging"></a>

### iPhone 模拟器 <a href="#iphone-simulator" id="iphone-simulator"></a>

iPhone 模拟器可以访问 localhost，您可以像往常一样将客户端指向本地开发服务器。不过，App 默认需要使用 https。要允许使用 http 进行测试，请按以下步骤操作。

1、在 Visual Studio Code 或其他编辑器中打开 `src/iOS/Info.plist` ，以便可以编辑原始 XML。（不要使用 Visual Studio 中的「Property List Editor」）

2、在顶层 `<dict>` 元素中添加以下代码：

```xml
<key>NSAppTransportSecurity</key>
<dict>
    <key>NSAllowsArbitraryLoads</key>
    <false/>
    <key>NSExceptionDomains</key>
    <dict>
        <key>localhost</key>
        <dict>
            <key>NSExceptionAllowsInsecureHTTPLoads</key>
            <true/>
            <key>NSIncludesSubdomains</key>
            <true/>
        </dict>
    </dict>
</dict>
```

3、保存并退出 `Info.plist`

4、在启动之前按 `Command` + `B` 强制运行新的构建

5、不要推送这些更改 :)

### iPhone 设备 <a href="#iphone-device" id="iphone-device"></a>

该设备无法直接访问 Mac 的 localhost，因此您可以遵循[本指南](https://ymoondhra.medium.com/how-to-run-localhost-on-your-iphone-4110a54d1896)来连接它们。

完成此操作后，您还必须修改 `Info.plist` 以允许 http 用于测试，如之前在模拟器测试中所解释的那样。

您也很可能需要更改服务器上每个项目的 `Properties` 上的 `launchSettings.json`。在那里，您需要更改 `iisSettings -> iisExpress` 和 `profiles -> Identify` 的 `applicationUrl` ，以便它显示 `name.local` 而不是 `localhost`，其中 `name` 是您在 Mac 共享配置中设置的计算机名称。

在实际测试 App 之前，请打开浏览器并尝试通过访问 `http://name.local:4000/alive` 以连接到 `Api` 。如果这不起作用，请查看指南或服务器配置中的步骤。确保您的 `User secrets` 也是最新的。

最后，您必须在手机上配置 `Api` 和 `Identity` URL 才能使用 `http://name.local:4000` 和 `http://name.local:33656` ，其中 `name` 是您在 Mac 共享配置中设置的计算机名称。

### iOS 扩展 <a href="#ios-extensions" id="ios-extensions"></a>

1. 将 iOS 扩展项目设置为启动项目
2. 您将收到一个弹出窗口，显示「Waiting for the debugger to connect...」（正在等待调试器连接...）
3. 不要打开 Bitwarden App（否则调试器将连接到它而不是连接到扩展）。相反，触发扩展
4. 您的扩展断点现在应该被命中

例如：如果您想调试 **iOS.Autofill** 扩展，您需要完成步骤 1-3，然后转到您的 iOS 设备，打开浏览器，登录，点击钥匙图标并从底部弹出窗口打开 Bitwarden。

### 使用服务器隧道​ <a href="#using-server-tunneling" id="using-server-tunneling"></a>

您应该使用一个[到本地服务器的代理隧道](/getting-started/server/tunnel.md)，让您的 App 直接与之连接，而不是将设备或模拟器配置为忽略 SSL 证书。

### 推送通知（实时同步和无密码）​ <a href="#push-notifications-live-sync--passwordless" id="push-notifications-live-sync--passwordless"></a>

推送通知当前不可用于调试部署。它们仅在 TestFlight 和生产版本上受支持。


---

# Agent Instructions: Querying This Documentation

If you need additional information that is not directly available in this page, you can query the documentation dynamically by asking a question.

Perform an HTTP GET request on the current page URL with the `ask` query parameter:

```
GET https://dev.ppgg.in/getting-started/mobile/net-maui-legacy/ios.md?ask=<question>
```

The question should be specific, self-contained, and written in natural language.
The response will contain a direct answer to the question and relevant excerpts and sources from the documentation.

Use this mechanism when the answer is not explicitly present in the current page, you need clarification or additional context, or you want to retrieve related documentation sections.
